

Photo by Nick Morrison on Unsplash
Build a writing assistant application using ChatGPT API and NextJS


Without a doubt, everyone is familiar with ChatGPT, a recently developed AI bot that can converse and answer questions about nearly any topic. Despite the ongoing debates about the accuracy of its data, we cannot deny the immense potential of this tool and AI in boosting human productivity in many fields, such as programming and marketing.
In this article, I will use its API to write a simple application to help users learn English, specifically to optimize IELTS Writing and Speaking essay.
Of course, a lot of code in this application was written by ChatGPT 😃
Because OpenAI has not yet opened its ChatGPT API to the public, we will use the Text Completion API to generate text similar to ChatGPT.
You can refer to it here.
The features of this application include:
From essay types: IELTS Writing task 2 and user-inputted topics, the application provides suggestions and creates sample essays.
Edit errors, suggest sentences, explain the meaning of words, ... based on the text the user has entered and the essay topic.
You can check the source code of the project here.
https://github.com/ngviethoang/ai-writing-assistant
Demo application.
Prerequisite
Create a NextJS project
yarn create next-app --typescript
Install the dependencies: OpenAI client, ChakraUI (UI framework)
yarn add @chakra-ui/react @emotion/react @emotion/styled framer-motion
yarn add openai
Register OpenAI API key
Log in to your OpenAI account at the https://platform.openai.com/ page.
Create API Secret Key
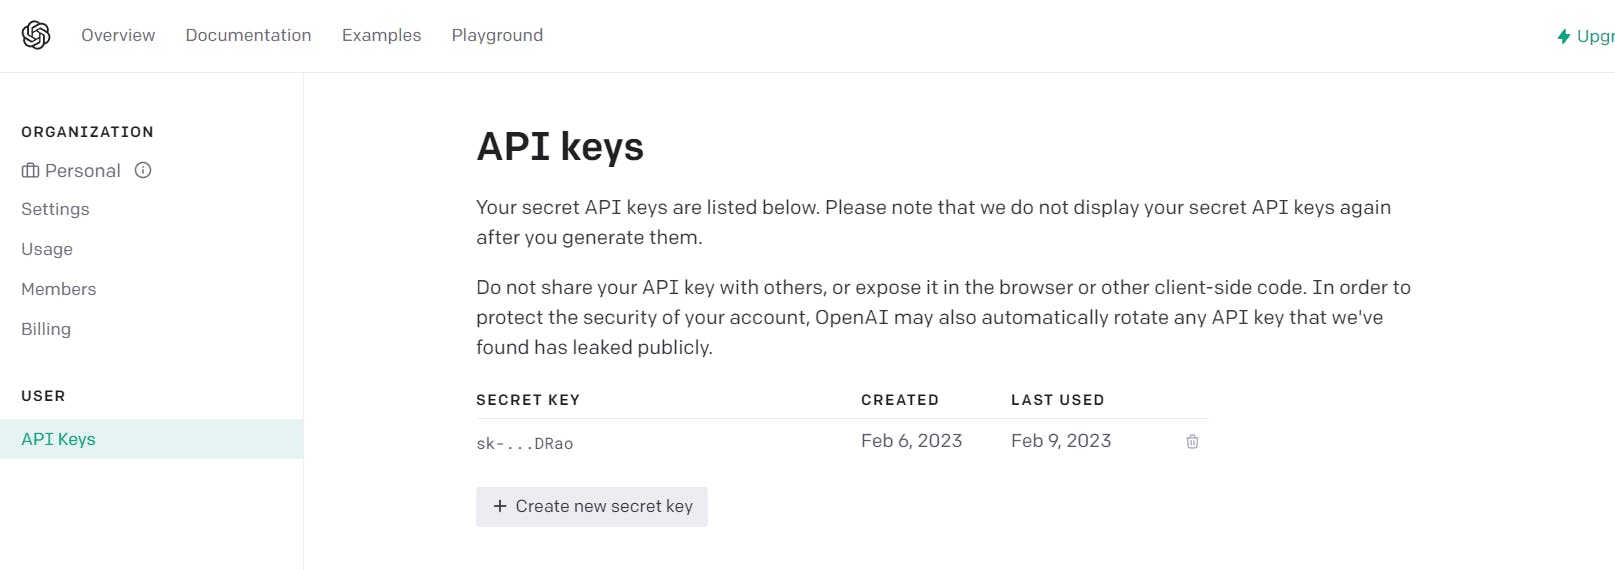
Create a .env file in the project and save the secret key.
OPENAI_API_KEY=[INSERT YOUR KEY]
Add this .env file to the .gitignore file to avoid exposing keys when committing code.
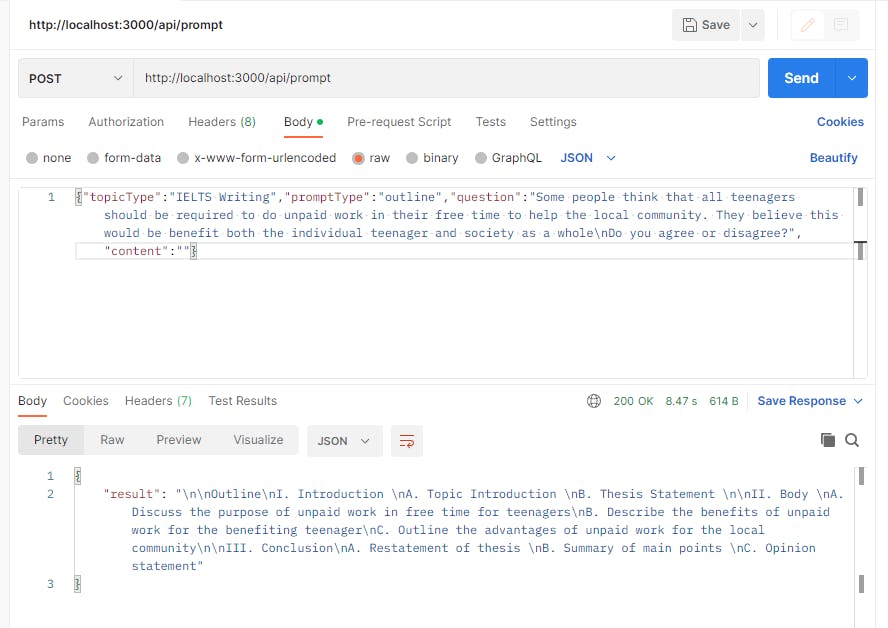
Building prompt to interact with the API
To communicate with the Text Completion API, we need to use prompts. This is an important step to get the desired output. According to the terminology in NLP, it is called prompt engineering.
Here is an example of a prompt to create a template outline for an IELTS Writing task essay based on the given topic.
Act as an IELTS test taker with a band score of 8.0. Write an essay outline in response to the following IELTS Writing Task 2 question: [insert IELTS Writing Task 2 question]
Here we can define the parameters that can be passed up from the UI:
actor: an IELTS test taker with a band score of 8.0question: IELTS Writing Task 2 questioncontent: The text entered by the user.
Create a getPrompt function to query the API based on the parameters actor, question, content.
const getPrompt = (topicType: string, promptType: string, topic: string, content: string) => {
  let actor, questionType
  switch (topicType) {
    case 'IELTS Writing':
      questionType = 'IELTS Writing Task 2'
      actor = 'an IELTS test taker with a band score of 8.0'
      break
    case 'IELTS Speaking':
      questionType = 'IELTS Speaking'
      actor = 'an IELTS test taker with a band score of 8.0'
      break
    default:
      questionType = ''
      actor = 'a person'
      break
  }

  switch (promptType) {
        case 'outline':
      return `Act as ${actor}. Write an essay outline in response to the following ${questionType} question: ${topic}`
    case 'support_arguments':
      return `Act as ${actor}. Given the following ${questionType} question, generate 3 arguments to support the statement: ${topic}`
    case 'oppose_arguments':
      return `Act as ${actor}. Given the following ${questionType} question, generate 3 arguments to oppose the statement: ${topic}`
    case 'sample_answer':
      return `Act as ${actor}. Write an essay in response to the following ${questionType} question with at least 250 words: ${topic}`

    case 'summarize':
      return `Act as a summarizer and summarize this essay:
${content}`
        // ...

    default:
      return ''
  }
}
Creating an API Handler in NextJS
To create an API handler to process query results from Text Completion, create an API route in the pages/api/prompt.ts directory.
import type { NextApiRequest, NextApiResponse } from 'next'
import { Configuration, OpenAIApi } from 'openai';

const configuration = new Configuration({
  apiKey: process.env.OPENAI_API_KEY,
});
const openai = new OpenAIApi(configuration);

const isEmpty = (str: string) => !str.trim().length

export default async function handler(
  req: NextApiRequest,
  res: NextApiResponse<any>
) {
  if (!configuration.apiKey) {
    res.status(500).json({
      error: {
        message:
          'OpenAI API key not configured, please follow instructions in README.md',
      },
    });
    return;
  }

  const question = req.body.question || '';
  const topicType = req.body.topicType || '';
  const promptType = req.body.promptType || '';
  const content = req.body.content || '';

  if (isEmpty(question) || isEmpty(topicType) || isEmpty(promptType)) {
    res.status(400).json({
      error: {
        message: 'Invalid args',
      },
    });
    return;
  }

  const prompt = getPrompt(topicType, promptType, question, content)
  if (isEmpty(prompt)) {
    res.status(400).json({
      error: {
        message: 'Invalid prompt',
      },
    });
    return;
  }

  try {
    const completion = await openai.createCompletion({
      model: 'text-davinci-003',
      prompt,
      temperature: 0.5,
      max_tokens: 550,
    });
    res.status(200).json({ result: completion.data.choices[0].text });
  } catch (error: any) {
    if (error.response) {
      console.error(error.response.status, error.response.data);
      res.status(error.response.status).json(error.response.data);
    } else {
      console.error(`Error with OpenAI API request: ${error.message}`);
      res.status(500).json({
        error: {
          message: 'An error occurred during your request.',
        },
      });
    }
  }
}
The parameters in the Text Completion API are used.
model: Use the latest and most capable model, text-davinci-003, among the GPT-3 models.prompt: The query built in the previous step.temperature: Determine the stability of the results, the higher the temperature the more diverse the model results.max_tokens: The maximum number of tokens returned, the number of tokens returned per prompt can be limited to reduce costs.
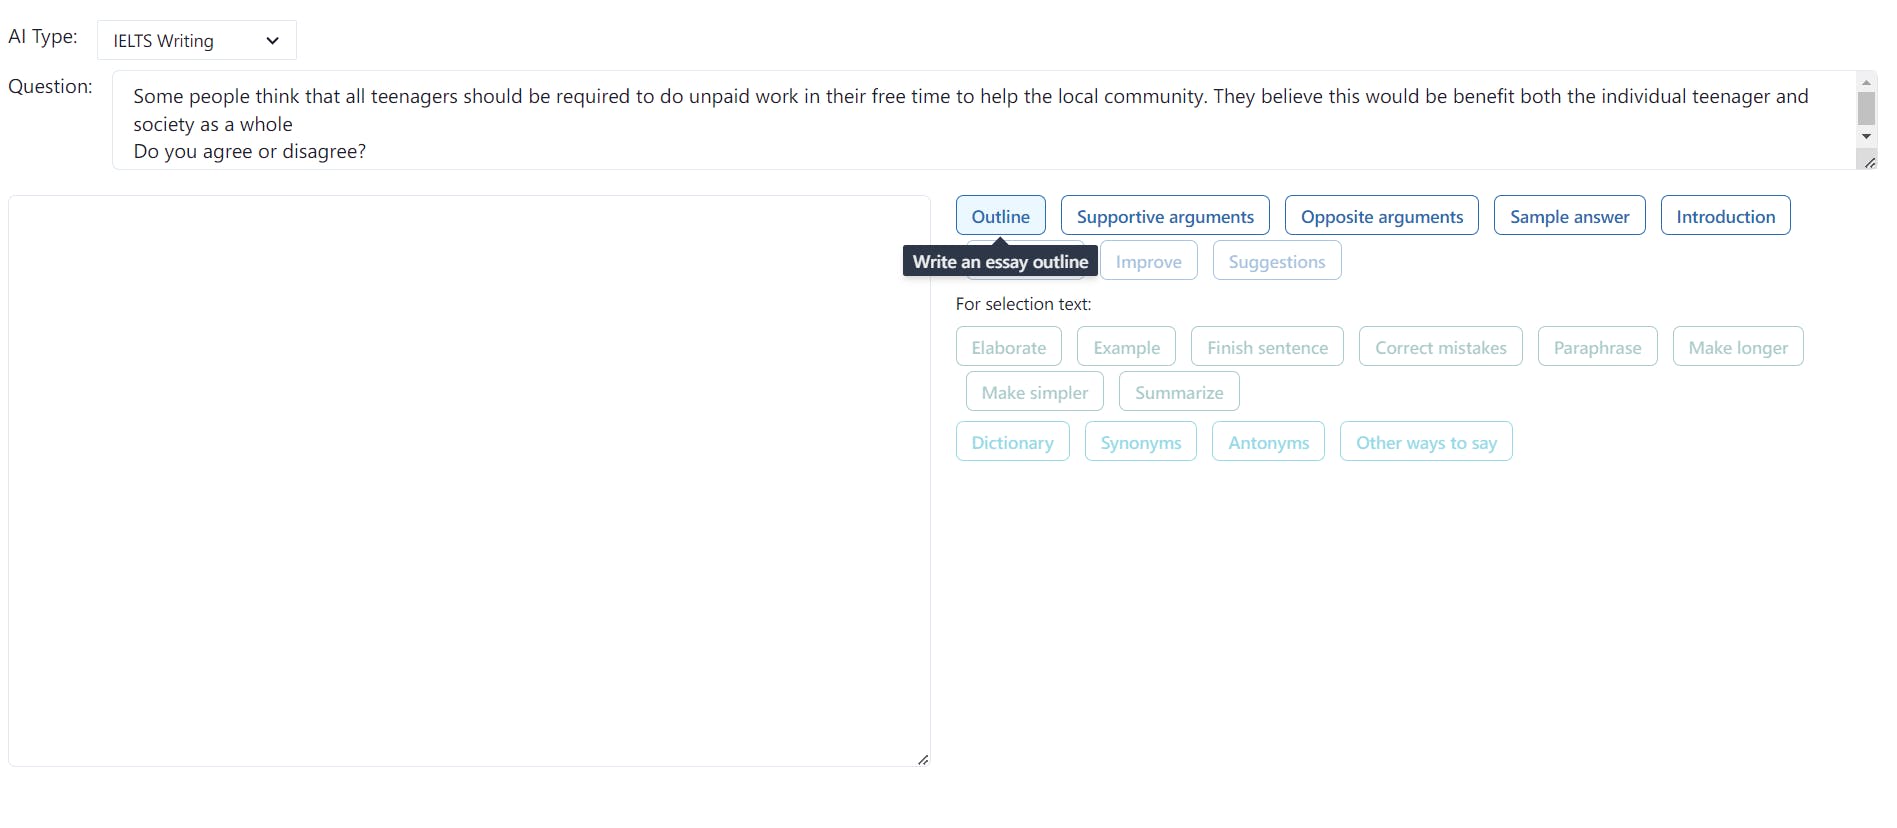
Frontend code
Next is the frontend part of the application, we will write the basic components such as
Text editor to input questions, and content of the article.
The buttons are used to call the corresponding API for functions such as creating an article outline, creating a sample article, correcting grammar, commenting, etc.
Display component for returning results from the API.
Create components and layout for the page using ChakraUI.
import { Box, Button, Heading, HStack, Select, Spinner, Text, Textarea, Tooltip, useToast, VStack } from '@chakra-ui/react';
import { useState } from 'react';

const topicTypes = ['IELTS Writing', 'IELTS Speaking'];

const Writing = () => {
  const [topicType, setTopicType] = useState(topicTypes[0]);
  const [question, setQuestion] = useState('');
  const [content, setContent] = useState('');
  const [selectedContent, setSelectedContent] = useState('');

  return (
    <div style={{ position: 'relative' }}>
      <VStack spacing={5} padding={5}>
        <VStack w={'100%'} spacing={2} alignItems="flex-start">
          <HStack alignItems="flex-start" w="100%" gap={2}>
            <Text>AI Type: </Text>
            <Select
              size={'sm'}
              w={40}
              value={topicType}
              onChange={(e) => setTopicType(e.target.value)}
            >
              {topicTypes.map((type) => (
                <option key={type} value={type}>
                  {type}
                </option>
              ))}
            </Select>
          </HStack>
          <HStack alignItems="flex-start" w="100%" gap={2}>
            <Text>Question: </Text>
            <Textarea
              value={question}
              onChange={(e) => setQuestion(e.target.value)}
            />
          </HStack>
        </VStack>

        <HStack spacing={5} alignItems="flex-start" w="100%">
          <VStack w="100%">
            <Textarea
              rows={20}
              value={content}
              onChange={(e) => setContent(e.target.value)}
              onSelect={(e: any) => {
                // Save the selected text to get API suggestions for these words.
                e.preventDefault();
                const { selectionStart, selectionEnd }: any = e.target;
                const selectedText = content.slice(selectionStart, selectionEnd);
                setSelectedContent(selectedText);
              }}
            />
          </VStack>
          {/* Render buttons and suggest results. */}
          <VStack alignItems="flex-start" w="100%"></VStack>
        </HStack>
      </VStack>
    </div>
  );
};

export default Writing;
Render buttons to generate prompts and suggestion results from the API.
const generateButtons = [
  { name: 'Outline', promptType: 'outline', tooltip: 'Write an essay outline' },
  {
    name: 'Supportive arguments',
    promptType: 'support_arguments',
    tooltip: 'generate 3 arguments to support the statement',
  },
  {
    name: 'Opposite arguments',
    promptType: 'oppose_arguments',
    tooltip: 'generate 3 arguments to oppose the statement',
  },
  // ... full list button in source code
];

const vocabButtons = [
  {
    name: 'Dictionary',
    promptType: 'dictionary',
    tooltip:
      'Explain the meaning of the word and give me an example of how to use it in real life',
  },
  { name: 'Synonyms', promptType: 'synonyms', tooltip: 'Give me 5 synonyms' },
  { name: 'Antonyms', promptType: 'antonyms', tooltip: 'Give me 5 antonyms' },
];

const [result, setResult] = useState({ title: '', content: '' });

const renderButtons = (buttons: any[], color: string, content: string, isDisabled: boolean) => {
  return (
    <HStack gap={1} wrap="wrap" alignItems="flex-start">
      {buttons.map((btn, i) => (
        <Tooltip key={i} hasArrow label={btn.tooltip}>
          <Button
            colorScheme={color}
            variant="outline"
            size="sm"
            isDisabled={isDisabled}
            onClick={async () => {
              setSelectContent();
              const resultContent = await queryPrompt(btn.promptType, content);
              if (resultContent) {
                setResult({ title: btn.name, content: resultContent });
              }
            }}
          >
            {btn.name}
          </Button>
        </Tooltip>
      ))}
    </HStack>
  );
};

return (
    // ...
    <VStack alignItems="flex-start" w="100%">
      {renderButtons(generateButtons, 'blue', content, false)}
        <Text fontSize="sm">For selection text: </Text>
        {/* Only enable the buttons when the text content is selected. */}
    {renderButtons(contentButtons, 'teal', selectedContent, !selectedContent )}

        {!!result.title && (
        <VStack alignItems="flex-start">
          <Heading size="md">{result.title}</Heading>
          <pre style={{ whiteSpace: 'pre-wrap', fontFamily: 'inherit' }}>
            {result.content}
          </pre>
        </VStack>
      )}
    </VStack>
    // ...
)
The result returned from the API.
This GPT API has a high cost, so we can use caching to save the results of previous queries.
Call the /api/prompt API when clicking the buttons above to display the suggestion results.
const toast = useToast();

const [loadingPrompt, setLoadingPrompt] = useState(false);

const queryPrompt = async (promptType: string, content: string) => {
  setLoadingPrompt(true);
  const response = await fetch('/api/prompt', {
    method: 'POST',
    headers: {
      Accept: 'application/json',
      'Content-Type': 'application/json',
    },
    body: JSON.stringify({ topicType, promptType, question, content }),
  });
  const data = await response.json();
  setLoadingPrompt(false);
  if (!response.ok) {
    toast({
      title: 'Error',
      description: data?.error?.message,
      status: 'error',
      duration: 9000,
      isClosable: true,
    });
    return '';
  }
  return (data.result || '').trim();
};
Run the application.
npm run dev
Application Interface
Conclusion
Through building this application, I hope you have gained an understanding of how to integrate AI into your application to serve other use cases such as chatbot, tutoring, etc.
See you in the next post!